Visa Digital Calendar
The digital calendar is the main program for which we developed the visa assembly language and microprocessor in the first place. It was part of the original class assignment that sparked the beginning of the bopkit project.
The goal was to write an assembly program to drive the display of a digital calendar that showed the date and the time of day.
7-segment display
The 7-segment calendar display is an OCaml Graphics application. It is implemented here.
It is available in the command line as:
$ visa digital-calendar display
This opens up a OCaml Graphics window, and displays a 7-segment calendar that looks like this:
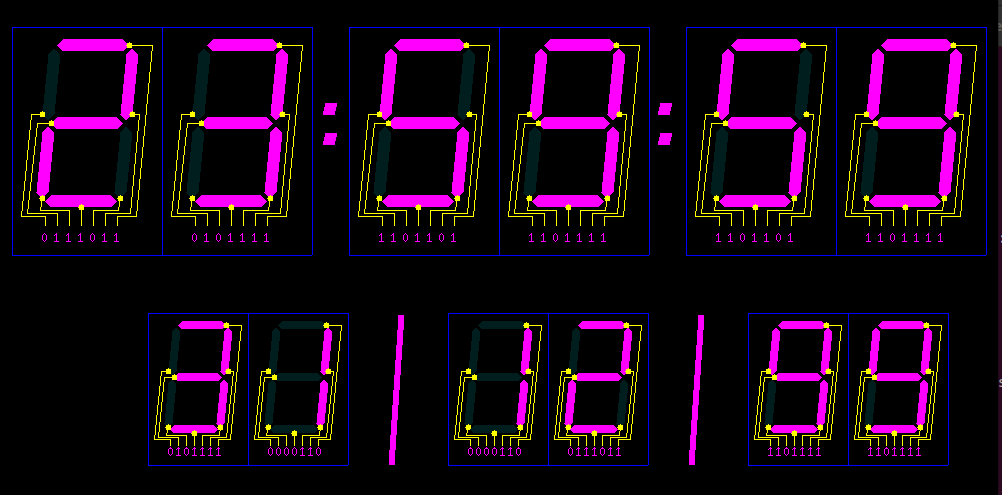
The application expects 91 bits on stdin, and responds by a blank line on stdout (this is the protocol for an external bopkit app of that interface).
You may try to feed a few inputs to play around with it. It's possible to use 7-segment to display some letters too!
$ visa digital-calendar display
0000000101111110110001011000111100111101100000000000000000000000000000000000000000000000000 <-- to enter on stdin
Testing the display
In order to test the display we added a command called gen-input that will
generate valid inputs based on the current date and time of day. You may simply
connect the two applications together using a unix pipe:
$ visa digital-calendar gen-input | visa digital-calendar display --no-output
Using a textual format
So we can check in the output of calendar simulations into textual regression tests, we added a command that consumes the same input as the graphic calendar and output the date and time in a textual format.
$ visa digital-calendar gen-input | visa digital-calendar print
22/04/23 - 15:34:06
...
Microprocessor output vs Calendar input
The microprocessor visa uses an output device to communicate with the outside world. In order to drive the digital calendar, we'll make use of 6 bytes of the output device, each encoding a value on 8 bits (between 0-255) for each of the digits of the time of day (sec, min, hour) and the date (day, month, year).
However, these bytes cannot be directly connected to the calendar display, because its input is not directly compatible. Indeed, the display expects 7-segment codes.
During the hardware simulation, as you'll see we'll use a small circuit that makes the connection between the two components (the microprocessor and the calendar display) and maps the output of the microprocessor into an input directly consumable by the display.
In the meantime, we want to be able to test the same operation implemented fully
in the software world. So we've added two more commands, gen-raw-input and
map-raw-input. The first one simulates what the microprocessor will output,
while the second simulate what the translating circuit will have to do.
To exercise this all, run:
$ visa digital-calendar gen-raw-input \
>   | visa digital-calendar map-raw-input \
>   | visa digital-calendar display --no-output
Assembly program
We're now ready to implement an visa-assembly program to drive the digital-calendar!
We're using internal memory addresses for each of the sec, min, hour, day,
month, and year, which we named using the define construct. We have part of
the code responsible for computing the expected number of days on a given month,
and make sure to call that code whenever we're beginning a new month. The code
starts by computing the expected number of days in February, and this code is
executed again each time the year changes.
The digital calendar program implemented in visa-assembly.
// A visa-assembly program to drive the display of a digital-calendar. This
// program was originally implemented by Mathieu Barbin & Ocan Sankur in 2007.

// GLOBAL VARIABLE DECLARATIONS (ADDRESSES).
define february 7
define year 5
define month 4
define day 3
define hour 2
define min 1
define sec 0
define days_in_current_month 8

// For a constant [x], [minus x] stores [-x] into [R1].
macro minus x
  load $x, R0
  not R0
  load #1, R1
  add
end

// Increment [var] by 1. If it equals [modulo] goto [carry_label],
// otherwise goto [return_label].
macro increment var, modulo, return_label, carry_label
  load $var, R0
  load #1, R1
  add
  store R1, $var
  load $modulo, R0
  cmp
  jmn $carry_label
  jmp $return_label
end

macro write_to_device_out local_address, device_address
  load $local_address, R0
  write R0, $device_address
end

// Computing the number of days in february:
COMPUTE_FEBRUARY:
  load year, R0
  load #3, R1
  and
  // If it is divisible by 4
  jmz @29
  jmn @28
29:
  load #29, R0
  jmp @FEB_WRITE
28:
  load #28, R0
FEB_WRITE:
  store R0, february

// MAIN PROGRAM
UPDATE_SEC:
  sleep
  write_to_device_out sec, 0
  write_to_device_out min, 1
  write_to_device_out hour, 2
  write_to_device_out day, 4
  write_to_device_out month, 5
  write_to_device_out year, 6

  // COUNT_SEC
  increment sec, #60, @UPDATE_SEC, @COUNT_MIN

COUNT_MIN:
  load #0, R0
  store R0, sec
  increment min, #60, @UPDATE_SEC, @COUNT_HOUR

COUNT_HOUR:
  load #0, R0
  store R0, min
  increment hour, #24, @UPDATE_SEC, @COUNT_DAY

COUNT_DAY:
  load #0, R0
  store R0, hour
  // Calculate days_in_current_month
  load month, R0

  // Is it February?
  load #1, R1
  cmp
  jmn @FEBRUARY

  // Else: (month <= 6) ==> (even month <=> 31)
  // and : (month >  6) ==> (even month <=> 30)
  minus #6
  load month, R0
  add
  // If it's zero, then month == 6
  jmz @LE6
  // Otherwise we check bit 2^7. If it's 1, this means the result was negative,
  // thus month < 6
  load #128, R0
  and
  cmp
  jmn @LE6
  jmp @G6

DONE:
  increment day, days_in_current_month, @UPDATE_SEC, @COUNT_MONTH

COUNT_MONTH:
  load #0, R0
  store R0, day
  increment month, #12, @UPDATE_SEC, @COUNT_YEAR

COUNT_YEAR:
  load #0, R0
  store R0, month
  increment year, #100, @COMPUTE_FEBRUARY, @NEW_CENTURY

NEW_CENTURY:
  load #0, R0
  store R0, year
  jmp @UPDATE_SEC

// Functions (with Labels) to compute the number of days in the current month:

FEBRUARY:
  load february, R0
  store R0, days_in_current_month
  jmp @DONE

// Case if month > 6.
G6:
  load month, R0
  load #1, R1
  and
  jmz @F30
F31:
  load #31, R0
  jmp @W
F30:
  load #30, R0
W:
  store R0, days_in_current_month
  jmp @DONE

// Case if month <= 6.
LE6:
  load month, R0
  load #1, R1
  and
  jmn @F30
  jmp @F31
Assembled
For the program to be able to fit into the microprocessor ROM code, it has to have a binary representation that fits on 256 bytes.
$ visa assemble calendar.asm | wc -l
210
We're in good shape here!
Simulation
Now that we have the assembly program, we can simulate its execution with the
visa simulator. Whether we're running the simulator, or executing the
microprocessor on the executable won't change that the output will be the raw
output device one. To connect that output to a calendar display, we'll need to
map it. For now, we're still doing that with our software version
map-raw-input.
$ visa run circuit/calendar.asm \
   | visa digital-calendar map-raw-input \
   | visa digital-calendar print --clear-on-reprint
00/01/00 - 00:00:00
00/01/00 - 00:00:00
00/01/00 - 00:00:00
00/01/00 - 00:00:04
Initializing a different date
The microprocessor memory can be initialized with values, in which case the
calendar will start incrementing from that date rather than from
00/01/00 -00:00:00. We made sure this would work, so we were careful not to erase the
initial memory contents in the executable.
We implemented a small executable whose job is to create the initial memory in
the format that's expected by the calendar.asm program. That's what
get_date.exe is about. Here is an example of usage:
$ ./get_date.exe '23:59:58' '2023/01/30'
// Initial memory contents for Visa
// Generated by: ./get_date.exe '23:59:58' '2023/01/30'
01011100 // sec
11011100 // min
11101000 // hou
10111000 // day
00000000 // mon
11101000 // yea
To be able to feed this contents to the simulation, we simply save it to a file, and supply the filename to the simulator:
$ ./get_date.exe '23:59:58' '2023/01/30' > my-initial-memory.txt
$ visa run calendar.asm \
>     --sleep false \
>     --stop-after-n-outputs 20 \
>     --initial-memory my-initial-memory.txt \
>   | visa digital-calendar map-raw-input \
>   | visa digital-calendar print
01/01/00 - 00:00:58
01/01/00 - 00:59:58
01/01/00 - 23:59:58
30/01/00 - 23:59:58
30/01/23 - 23:59:58
30/01/23 - 23:59:59
30/01/23 - 23:59:00
30/01/23 - 23:00:00
30/01/23 - 00:00:00
31/01/23 - 00:00:00
31/01/23 - 00:00:01
31/01/23 - 00:00:02
31/01/23 - 00:00:03
31/01/23 - 00:00:04
31/01/23 - 00:00:05
31/01/23 - 00:00:06
31/01/23 - 00:00:07
31/01/23 - 00:00:08
31/01/23 - 00:00:09
31/01/23 - 00:00:10
We'll dive into this kind of simulation and the output that this produces in more details in the section dedicated to testing visa.
Debugging
As we've seen in the Assembler section of the doc, the visa project comes with a debugger, so we've used that to feel more confident making changes to the file!
$ visa-debugger bogue calendar.asm
The whole program can be tested quite easily by tweaking the contents of the
register R1 right before it is checked to determine if the increment operation
reached the maximum value allowed for each of the sec, min, hour, etc.